Sunday, March 30, 2014

First Layer of Uni Pultrusion

Russell helped me to get the first layer of uni on yesterday.   Most of the task is preparation.

18.5 foot sections of pultrusion are cut off from the roll, cleaned, taped, sanded, vacuumed and wiped.

The first adventure was cutting the pieces off the 500 foot roll.  I was lulled into feeling safe as I cut off the cable ties that held the roll.  The roll laid there calmly. I had expected a little more reaction from releasing it.  Since it seemed under control, I neglected to add any different ties or restraint mechanism. While pulling out a length, the roll slipped off the table and exploded.  It suddenly expanded into a 15 feet wide and 10 foot high hairball.


After cutting of the first 5 strips, there was still about 400 feet of tangle.  Sorting it out was futile. I would pull out 20-30 feet and find a knot.   I will need to pull all of the aka strips and cut them.  This will consume most of the roll.

I will need to build some sort of reel with a cage for the next roll.  If you use this stuff, fair warning.

The strips were clamped to the table to measure and cut them.   This is a bit of a wrestling match.

The next step was to wipe them down with solvent.  There was dirt and a bit of adhesive from duct tape at the factory.  I used denatured alcohol.  Russell thought acetone would be much better.  Ether of these need to be sanded as they leave residues.  Apparently the gold standard is medical and/or HPLC acetone which is pure and leaves no residue.  Big time Grand Prix builds use this at over $200 a gallon.

The next step is to tape the back of the strips with packing tape to hold them together.  The tape is placed perpendicular to the strips.

Sanding was done with 150 grit paper.  Russell warned me that different paper brands and grades can leave residues on composites. I went with Festool Granat which is designed for composites.


An area that has not been sanded.  The sanding should remove all of the shiny epoxy surface without digging to far into the carbon.


Sanded Strips.

The next step is to wipe, wipe and wipe again with clean cotton until the carbon dust is gone.  I found that dust gathers between the taped strips and the unit needs to be flipped to get it out.

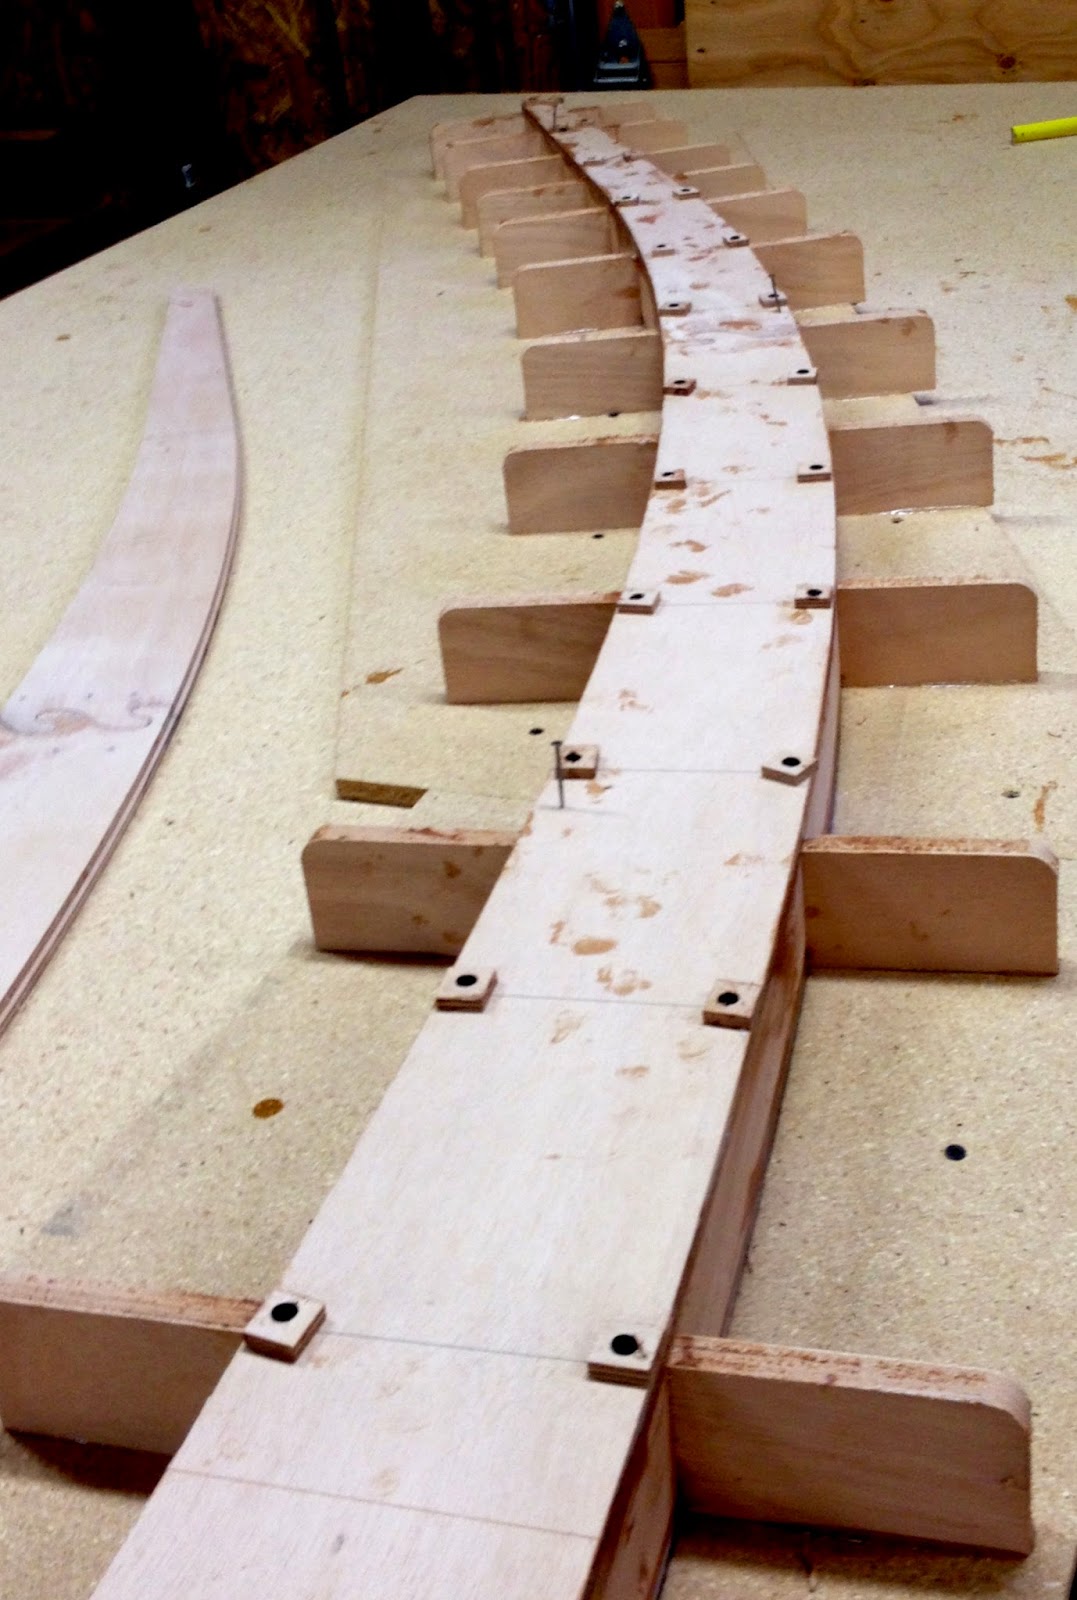
Why all of this cleaning?  The optimal bond is very sensitive to dust, oil (off hands) and other debris. The akas are one of the most highly loaded areas of the boat and therefore sensitive to failure from a poor bond.  Believe it or not, the wooden box of the beam could still flex along it's length before the carbon went on.  We supported the curve where the beam rose off the table with legs.  The weight of the clamps could have deflected the curve of the beam.

The beam and carbon are primed with un-thickened epoxy. Then a normal bonding batch is placed on the beam with a notched trowel.


The beam after glue up.


Clamps were placed at 6 inch intervals.  Aligning the strips in the center of the beam is an issue.  We taped the carbon down temporarily to keep it aligned.  Clamping was done from one end to the other to remove any slack and prevent bridging on the curve.

I made an attempt to make guide blocks to keep the strips aligned, but they did not turn out very well. See photo above. I did not make them big enough and they had to be glued on the rounded over corners of the box. They were not very accurate.  It would be best if there were some sort of fool proof jig for this, so you would not have to rely on aligning by eye.  The buttered pieces are also very slippery.  You have to watch that tightening clamps does not  slide the strips one way or another.


Task time: 5 hours
Total project time: 212 hours

Friday, March 28, 2014

Cool Rendering

Paul was explaining some details to me and sent this rendering.

Property of Bieker Boats LLC.


Wednesday, March 26, 2014

Bulkhead Reinforcement Templates

The bulkheads at both ends of the main cabin get reinforced with 19mm timber.  The bolts that hold the akas to the vaka go through these points.  I will be using yellow cedar for these.  I made some templates out of MDF today to insure a good fit before cutting expensive wood.  These will get screwed to the cedar and will guide a flush trim bit on the router table. I should get exact copies in cedar if all goes well.


These bulkheads get assembled and finished before inserting them into the hull.


Here is the interior of Jzerro again.  You can see similar bulkheads at the end of the cabin.


Task time: 3 hours
Total project time: 197 hours

Slow Progress

Life got in the way and between a trip to get materials and other responsibilities not much got done for four days.

I did do some prep for the next steps on the akas.  Surface sanding and rounding over the edges.  I have also been pondering the best methods to apply layers of strips of pultrusion and 400 gsm carbon double bias.  These have to be clamped and/or vacuum bagged over the eighteen foot span.


A layer of five strips of pultrusion will look something like this only longer.


Current state of the beams.


Also got a stack of douglas fir ripped for the mainsheet beam laminations.  These were a bit wet and will need to dry with the heaters and a fan for a while.  Think I need a moisture gauge.


Task time: 8 hours
Total project time: 194 hours

Friday, March 21, 2014

Like Coffee...

Strong and Black.  Did some shopping for carbon fiber yesterday.  The cloth came from Fiberglass Supply. The pultrusion came from Goodwinds LLC.  These are both local Washington companies that supply projects world wide.  The cloth will support high load areas such as the akas, mast step, mainsheet beams, etc.  The pultrusion will replace unidirectional carbon in many places such as the akas, rudders and dagger foil.


400 gsm (12 osy) bi-directional knit.


200 gsm (6 osy) woven coth.


Pultruded flat rod.


The picture of the pultrusion shows 2000 feet in four 500 foot rolls. I have not weighed it, but is probably is about 45 pounds. Paul tells me that this is 1.5 times stronger than the same thickness of wet laminated unidirectional.  Quality is higher and more consistent.

Thursday, March 20, 2014

Interesting Idea for a Build Table

I ran across an interesting idea for a build table for projects similar to this.  It has the advantage of being CNCed, so it will be quite flat.  More importantly, small sections could be made and assembled into a large table.  Later they might be disassembled for storage.


The width and height can be varied by tweaking the CAD files.  

More details at Makezine and AtFAB


Second Aka Assembled

The last few days were spent assembling the second aka.  It was the same process as the first, but went a bit faster.

Task time: 13 hours
Total project time: 186 hours

Monday, March 17, 2014

First Aka


The first aka is out of the mold and about ready for carbon.  I have reset the jig blocks and am starting to glue up the second one.


Task time: 5 hours
Total project time: 173 hours

Sunday, March 16, 2014

Buttoning Up First Aka

We put the lid on the first aka.  There were quite a few small steps to getting this right.  The first things were to thoroughly coat all of the raw wood in the interior.  I went over the wet epoxy with a heat gun to thin it and make sure it penetrated pretty well.  

Next was filling in the solid wood area on the windward end.  This took three pieces of 18mm plywood that ended up stacked. The pieces were shaped to fit pretty tight.  It was messy because you need to use thickened epoxy very liberally so that squeeze out from the layers would force up the side gaps. The very end got filled with solid epoxy since wood would not fit very well.


Wood and epoxy in the "nose".


Clamping Pads.

Clamping pads had to be made out of 6mm plywood.  These are 3/4 by 3/4 inch squares pre-drilled with oversize holes.  The top panel was pre-drilled every seven inches for even clamping pressure.


7/64s holes for screws.


An  ad hoc  jig to drill all the holes 3/16ths from the edge and centered on the 18mm (3/4 inch plywood).

The top is temporarily nailed to keep it aligned in place while the holes are drilled down into the plywood sides through the top plate.  The nails get pulled partially out.  A small bit of nail is left exposed at the bottom of the top panel.  These nails help you find their original holes and align the panel when it is extremely slick with thickened epoxy.

The remaining surfaces and edges get primed and then buttered with thickened epoxy.  The panel is upside down to be primed.

A crucial moment is when you have to flip the flexible 18 foot panel on to the box sides.  You need to drop it fairly close to it's final position so that you don't rub glue off of area by shifting it while it is laying unclamped.


After clamping.


The 64 screws are then run through the pads into the pre-drilled holes.  The screws are #6 1 inch drywall type, which have been coated lightly with WD-40.  The lubricant keeps the screws from bonding to the work.  Without this, the screws would probably break off when removing them.  We don't like metal lodged in our plywood.


The blocking on the leeward end.  The excess side panel will be trimmed when dry.


Lastly, excess squeeze-out must be carefully scraped off the sides to reduce sanding.


Task time: 8 hours
Total project time: 168 hours


Thursday, March 13, 2014

Cheers in the Shop

Russell brought  a nice bit of inspiration back from a recent trip.  This is a poster of Dick Newick's Cheers.  It looks like Tom Follett taking a sun site from the cabin.  Apparently some of these posters will be available for proa enthusiasts soon.


Painting by Bruce A. Alderson, ASMA


The second side of the aka went on today.


Task time: 2 hours
Total project time: 160 hours

Wednesday, March 12, 2014

Gluing Internal Aka Blocking


This is a small intermediate task today.  The blocks are placed in before the other side so that glue will not be scraped off.  If I attempt push these between the two sides, the buttered epoxy would all be pushed to the bottom or scraped at the top and there would not be a good bond.  

Tomorrow the jig blocks on the left will have to be temporarily removed so the side board can be swung in horizontally rather than pushed down vertically between the jig and internal block. Again to avoid scraping glue off.

These blocks will later be drilled to accept the bolts that anchor the beams to the main hull.


Task time: 1 hour
Total project time: 158 hours

Tuesday, March 11, 2014

Start of Aka Assembly

I was struggling with a good way to clamp up the aka parts.  Of course, Russell came and straightened me out.

We ended up making a new full length jig that will ensure that the pieces go together square and true. The steps are below:


Screwed down a sacrificial sheet of particle board to build tables.


Outline the panels and cover the area with packing tape.  The packing tape overlaps the outline a bit to catch squeeze out runs.  It is important to keep the tape flat and wrinkle free so that the panel will stay completely flat. 


Replace part and tack it so it won't move while gluing blocks.


Using 5 minute epoxy, fasten a very square edged block butted against the panel.


The back three quarters of the block are glued.  The areas against the panel and packing tape are skipped.


Let the epoxy cure and remove one side's tacks.


Prime the edge of the panel and the edge of the board.  A nice bead of thickened epoxy was run down the board.  Russell uses a ziplock bag like a pastry bag.  This is explained in his book.


The setup is about ready for clamping.  It is important to not rub off any glue as the board goes in.


The clamps are partially tightened and the the board is tapped down with a hammer to seat it well.


Clamps are tightened.  Epoxy squeeze out is scraped off the outside using a  sharpened tongue depressor as a chisel. The glue on the inside forms a small finger fillet by running a gloved finger down the corner.

With this clamping system, plywood could be used instead of laminated fir for the sharp bend.  The scarfs come out better that way and the materials are consistent.  I cut off the lamination and re-scarfed with the 18mm ply.

Let it dry.

Task time: 8 hours  (last 5 days)
Total project time: 157 hours

Wednesday, March 5, 2014

Unclamping Puzzle Joints

I cleaned up yesterday's puzzle joints.


Just released.


After some sanding.  Flatter than they look.


The results were reasonably pleasing.  Some of the joints had part of the glue drain out leaving slight gaps at the upper surface.  The joints are quite strong regardless.  You can hold the panel up and let the ends droop with no problems.  

The gaps and the holes can be filled with thickened epoxy in a syringe. If the thickened batch is mixed with the proper amount of brown fairing filler you can match the color and the holes will disappear. Color is only an issue on visible interior joints.

Did more work on internal blocking and glued another four joints.

Task time: 4 hours 
Total project time: 149 hours

Tuesday, March 4, 2014

Puzzle Joints on Aka

Finally putting something together today.  The first puzzle joints on the project are on the aka sides.  I had to put the two twelve foot tables together since the akas are eighteen feet.  The joined parts need to be perfectly flat.

Russell suggests gluing parts that are in pairs together at once.  The pair can be stacked and perfectly aligned to one another.  If there is any variation in the alignment, it shows up the same on both parts so that the sides of the component will be identical.

Pairs are clamped down flat using two cover boards and nails or screws.  Screws can give a little more pressure on large parts.

The other main thing to remember is to put plastic or wax paper between each layer.  It would be easy to glue the whole pile to the table and then it would be back to the CNC.


Dry fit.


Pair stacked with clamping boards.


Pair pre-drilled for #6 drywall screws.


Applying epoxy.


Fully clamped.

These will dry and I can but the small end joints together tomorrow.

Also got some more glue up done on solid wood aka components.


Task time: 4 hours 
Total project time: 145 hours


Monday, March 3, 2014

Continuing Aka Work


I have been doing more scarfing. The interior blocking that reinforces the aka where it bolts to the main hull are shaped.  Unfortunately, I have some other commitments this week so productivity will drop a bit.


Sealing the blocking end grain well.


Task time: 8 hours (last 2 days)
Total project time: 141 hours